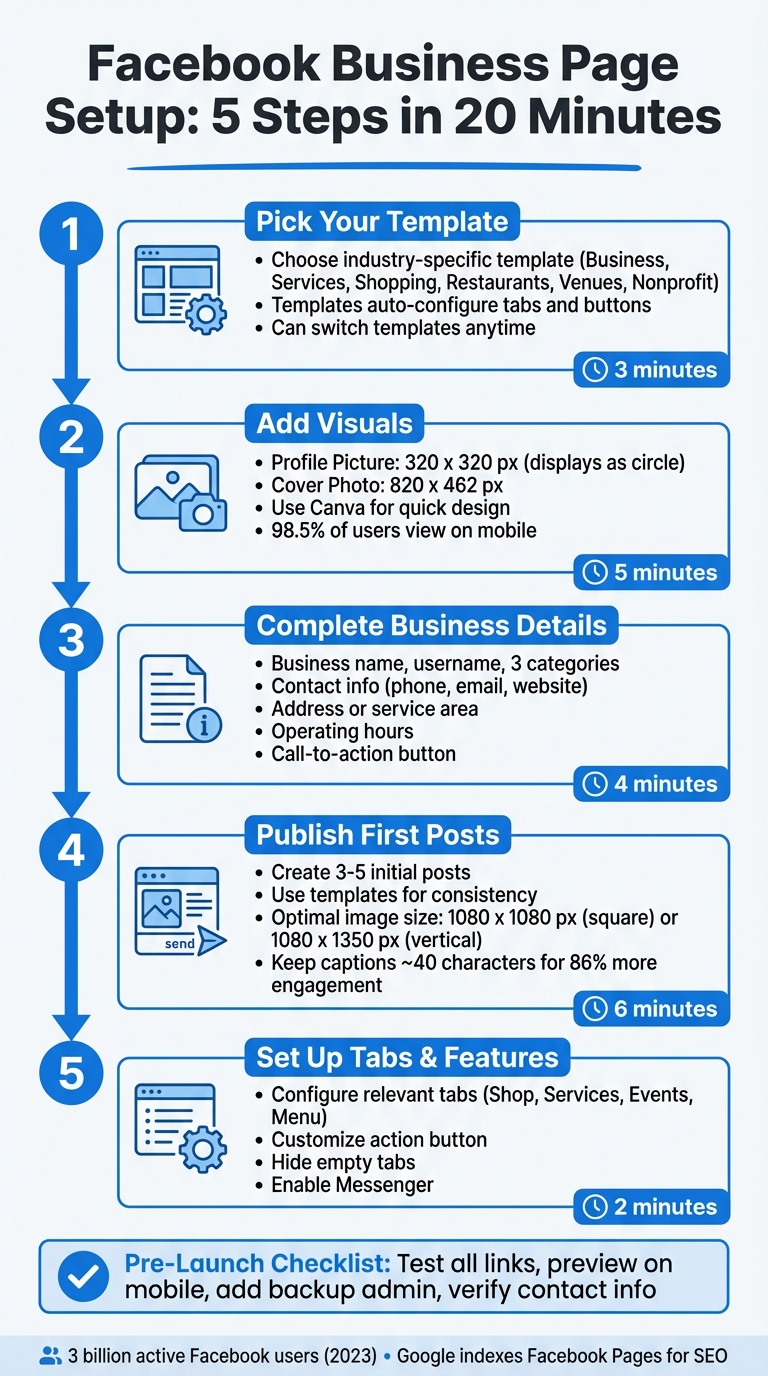
Creating a Facebook Business Page doesn't have to be complicated. In just 20 minutes, you can set up a professional-looking page that helps you connect with potential customers and improves your online visibility. Here’s a quick breakdown of the process:
- Choose a Template: Facebook offers industry-specific templates with pre-configured features, like "Menu" tabs for restaurants or "Shop" tabs for retailers. You can switch or customize these anytime.
- Add Visuals: Use a clear logo (320 x 320 px) for your profile picture and an engaging cover photo (820 x 462 px). Tools like Canva make this step quick and easy.
- Complete Business Details: Include your business name, contact info, operating hours, and a custom username for better searchability.
- Publish Initial Posts: Share 3–5 posts to make your page look active, such as an introduction, product highlights, or tips for your audience.
- Set Up Tabs and Features: Organize your page navigation with relevant tabs (e.g., Services, Reviews, Events) and customize your call-to-action button.
Before publishing, double-check your visuals, links, and settings to ensure everything looks polished. A well-prepared page can help you attract and engage your audience effectively.
5-Step Guide to Creating a Facebook Business Page in 20 Minutes
Ultimate Facebook Business Page Tutorial 2025 (Setup & Strategies)
sbb-itb-08dd11e
Step 1: Pick Your Facebook Page Template
The first step in setting up your Facebook business page is selecting the right template. Templates simplify the process by automatically setting up tabs and buttons based on your industry. For instance, if you choose the "Restaurants & Cafes" template, Facebook will add a "Menu" tab and set the call-to-action button to "Get Directions" - features that align with what customers expect from dining establishments.
"Facebook Page templates are pre-set layouts to help you tailor your Facebook Page to suit your unique business needs." – Stacey McLachlan, Editor-at-Large, Hootsuite
The good news? Your choice of template isn’t set in stone. You can switch templates whenever you like or tweak individual tabs after applying one. This flexibility lets you test different layouts to see what aligns best with your business goals.
Facebook Page Template Options
Facebook offers templates designed for various industries. The Business template is a versatile option for many brands and organizations, featuring tabs like "Jobs" and "Offers" to help with hiring and promotions. If you’re a service provider - like an accountant, consultant, or hairstylist - the Services template is a better fit, as it highlights a "Services" tab where you can list what you offer and display customer reviews.
For food and beverage businesses, the Restaurants & Cafes template is a standout. It includes a "Menu" tab, making it easy to share photos of your dishes and pricing details. E-commerce brands and retailers can benefit from the Shopping template, which prioritizes a "Shop" tab for showcasing products. Meanwhile, venues like theaters or stadiums might choose the Venues template, which emphasizes "Events" and location details. Non-profits have their own tailored template with a "Donate" button, making it easier to support fundraising efforts.
How to Choose and Apply Your Template
Start by thinking about your business’s main objective. For instance, if your focus is selling products, the Shopping template is a great choice. If you’re offering services like repairs or consultations, the Services template will be more effective. Once you’ve decided, applying your template is simple:
- Log into your business page.
- Go to Settings > Templates and Tabs.
- Click Edit next to "Current Template."
- Select your template and hit Apply Template.
After applying, you’re free to customize further. Head back to the Templates and Tabs section to reorder, toggle, or adjust your tabs and call-to-action button. For example, if you run a retail store, you might move the "Shop" tab to a more prominent position in the menu to make it easier for customers to find.
With your template set up, you’re ready to move on to personalizing your page with a cover photo and profile picture in Step 2.
Step 2: Add Your Cover Photo and Profile Picture
Your cover photo and profile picture are the first things visitors notice when they land on your page. Think of them as your digital storefront - they set the tone and help establish trust with potential customers. Plus, high-quality visuals can significantly boost engagement on Facebook posts.
"Your Facebook cover photo is one of the first things people will see when visiting your brand's Facebook Page. You only get one shot to make a good impression." – Angela Rollins, Freelance Writer
For your profile picture, stick to your company logo. Use a minimum size of 320 x 320 pixels for clarity, keeping in mind that Facebook crops it into a circle. For your cover photo, the ideal size is 820 x 462 pixels, ensuring it looks sharp on both desktop and mobile screens.
Cover Photo Size and Design Tips
When designing your cover photo, center any important text or graphics. Remember, the profile picture overlaps the bottom-left corner, and mobile devices may crop the edges differently than desktops. If your cover photo includes text or a logo, save it as a PNG file to avoid pixelation. For photos without text, use sRGB JPG files under 100 kilobytes to ensure fast loading.
| Element | Recommended Sizes | Desktop Display | Mobile Display |
|---|---|---|---|
| Profile Picture | 320 x 320 px | 176 x 176 px | 196 x 196 px |
| Cover Photo | 820 x 462 px | 820 x 312 px | 640 x 360 px |
Since 98.5% of Facebook users access the platform on mobile devices, always check how your cover photo looks on a smartphone after uploading it. If it doesn’t align perfectly, use Facebook’s repositioning tool to adjust it during the upload process.
Customize Templates in Minutes
Don’t have a design background? No problem. Tools like Canva offer pre-sized Facebook cover templates that make the process simple. Choose a template that matches your brand’s style or industry, then personalize it by uploading your logo, tweaking the colors to fit your branding, and replacing placeholder text with your business name or tagline. Once you’re satisfied, download the design as a PNG (for images with text or logos) or JPG (for photos) and upload it directly to your Facebook page. The whole process is quick and ensures a polished, professional look.
With your visuals ready, you’re all set to move on to Step 3 and complete your business details.
Step 3: Complete Your About Section and Business Details
With your visuals set, it’s time to focus on the details that build trust and improve your search rankings. Did you know Google indexes Facebook Business Pages? That means the information you include here can directly influence how your business appears in search results. These details are the backbone of your page optimization strategy.
Start with the essentials: your business name (up to 70 characters), a custom username (like facebook.com/YourBusiness) for a professional and shareable URL, and up to three relevant categories. Categories are important because they unlock specific Facebook features, such as menus for restaurants or check-ins for retail stores. Next, add your contact details, including a professional email, phone number, and your full website URL (use https:// for security). If your business has a physical location, include your full address to boost local SEO. For service-based businesses without a storefront, define the service area instead.
Set your operating hours - whether it’s daily schedules or marking “Always Open” to set customer expectations. Lastly, customize your Call-to-Action (CTA) button to match your primary goal, whether that’s “Shop on Website,” “Book Now,” or “Contact Us”.
Required Business Information
Your About section is a key opportunity to create a complete and professional profile. Include your mission statement, the year your business was founded, and details about the products or services you offer. If relevant, also add your price range and a link to your privacy policy to meet legal requirements and show transparency.
Here’s a quick reference of what to include:
| Detail Category | Essential Details | Why It Matters |
|---|---|---|
| Identity | Page Name, Username, Categories (up to 3) | Improves searchability and unlocks relevant features |
| Contact | Phone Number, Business Email, Website URL | Makes it easy for customers to connect with you |
| Location | Street Address or Service Area | Boosts local SEO and helps with physical discovery |
| Operations | Standard Hours, Holiday Hours | Sets customer expectations for availability |
| Narrative | Short Bio (255 characters), Mission Statement | Builds trust and enhances search ranking |
Avoid setting age or country restrictions, as these can prevent your page from being visible to non-logged-in users and hinder search engine indexing.
Write a Clear Business Description
Your business description is your chance to explain what you do and why it matters. Facebook offers two options: a short bio (up to 255 characters) that appears in search results, and a longer description with no character limit for your full brand story. The short bio is especially important - it’s often the first thing people see, so every word should count.
“Your About description should be designed to drive leads. Keep it short and use four to five sentences about your business that engage audiences as soon as they hit your page.” – Neil Patel, Co-Founder of NP Digital
Focus on how your business solves problems rather than just listing facts. In the short bio, aim for one to three sentences, making sure the first 155 characters include the most critical information for search previews. Use primary industry keywords naturally to improve visibility on Facebook and Google. For the longer description, write four to five sentences that inspire visitors to take action - whether it’s visiting your website, calling your business, or making a purchase. Keep the tone aligned with your brand, whether it’s professional, approachable, or community-driven.
With 78% of American consumers discovering new products on Facebook and 1.82 billion daily users, a well-thought-out description can help you attract the right audience. Once your profile is polished, you’ll be ready to dive into creating engaging posts.
Step 4: Create and Publish Your First Posts
Now that your profile is ready, it’s time to make your presence known by publishing 3–5 posts to kick things off.
Templates can be a game-changer here. These reusable designs incorporate your brand’s essentials - like logos, colors, and fonts - while letting you tweak the text and images for each campaign. With templates, you can create posts in as little as 15–30 minutes.
Start with a variety of post types to connect with your audience right away. For example:
- An introduction post: Share your story - why you started your business and what makes it special.
- A behind-the-scenes glimpse: Highlight your team or workspace to add a personal touch.
- An engagement post: Use a poll or ask a question to spark interaction.
Visuals are key. On Facebook, nearly 50% of brand content includes images, which get 37% more engagement than text-only posts. To optimize your visuals, design square images at 1080 x 1080 pixels or vertical posts at 1080 x 1350 pixels. These dimensions ensure your content looks great and uses the screen effectively.
"Go beyond posts and think about connections. Our Facebook Page isn't just a billboard; it's a hub that connects our content, community, and customer stories." – Andreea Constantin, Head of Brand Marketing and Communities, LearnWorlds
Organize Templates by Goals
Templates can help you stay efficient while keeping your posts focused. Organize them by purpose:
- Brand Awareness: Use bold logos and striking visuals.
- Engagement: Include interactive elements like questions or polls.
- Promotions: Add clear calls-to-action like "Shop Now."
- Educational Content: Share quick, helpful tips.
When designing your templates, keep critical text and logos at least 150 pixels from the edges to avoid cropping on different devices. While AI tools can assist with captions and image ideas, always review and adjust them to reflect your brand’s unique personality.
Quick Content Creation with Templates
Set your visual standards early. Define your primary and secondary hex color codes, select fonts for headlines and body text, and establish safe zones for important elements. A strong template should include:
- A clear main point.
- A compelling call-to-action.
- Easy-to-read formatting, like bullet points.
For your first week, consider posting:
- A welcome post introducing your business.
- A product showcase highlighting your top offering.
- A value-driven post with a helpful tip for your audience.
Short captions - around 40 characters - can boost engagement by as much as 86%, so keep your text concise. Always preview posts on your smartphone to ensure text is readable and the visuals are clear.
Stay Consistent with Your Branding
Consistency in visuals and tone is crucial for building recognition. Stick with the same color palette, fonts, and photography style across all your posts, aligning them with your cover photo and business description. For example, landscapers might use earthy colors and clean fonts, while bakeries could opt for warm tones and close-up shots of their treats.
"If there is a style of photos or graphics you really like, continue to ensure that future posts also look like it. There are a lot of distractions when scrolling through a feed, and yours can stand out better if it looks like your brand and no one else's." – Mik Vance, Senior Manager of Design, Simply Business
Your brand voice matters just as much as visuals. Whether it’s professional, friendly, or playful, keep it consistent in every caption and comment. Don’t forget to include a call-to-action in every post - phrases like "Learn more" or "Shop now" encourage interaction. With Facebook Pages averaging an engagement rate of just 0.07%, actionable language is key.
Plan and Analyze Your Content
Focus your posts on three primary goals:
- Engage: Encourage interaction with polls or questions.
- Educate: Share useful tips or how-to guides.
- Excite: Highlight new products or special deals.
Use tools like Meta Business Suite to schedule posts in advance. Aim for one to two posts daily, and plan at least a week’s worth of content at a time. Check your Facebook Page Insights weekly to see what’s working and adjust your strategy accordingly.
Once your posts are live and aligned with your brand, you’ll be ready to move on to Step 5, where you’ll set up your business tabs and features.
Step 5: Set Up Business Tabs and Features
Once your content is published, it's time to organize your page navigation. Tabs are the clickable sections on your page where visitors can find specific information like your services, reviews, or upcoming events. Facebook provides default tabs, but you can also customize them based on your business needs.
Some tabs, like About, Reviews, Followers, Photos, and Videos, are permanent fixtures on your page. Beyond these, you can choose additional tabs that best fit your business type.
Choose the Right Tabs for Your Business
The tabs you select should align with the nature of your business. For example, a retail store might focus on a Shop tab, while a nonprofit might prioritize Events and Fundraising Tools. Here's a quick guide to help you decide:
| Business Type | Essential Tabs & Features |
|---|---|
| Restaurants & Cafes | Menu, Offers, Reviews, Photos |
| Service Providers | Services, Reviews, Appointments |
| Retail / Shopping | Shop, Offers, Photos |
| Venues / Nonprofits | Events, Fundraising Tools, About |
| Public Figures | Videos, Photos, Community |
Your Action Button is another key feature. This prominent call-to-action at the top of your page should reflect your main goal. For instance, a service-based business might use "Book Now", while a restaurant could go with "Start Order" or "Get Directions."
Configure Tabs and Features
To manage your tabs, log into Facebook and switch to your Business Page profile. Then:
- Click your Page name, open the More dropdown, and select Manage Sections.
- Check the boxes for tabs you want to display and uncheck the ones you don’t need.
- Drag and drop tabs to rearrange them, prioritizing the most important sections.
If you want to apply a specific template, go to More > Edit Tabs, browse the available options (like Nonprofit, Services, or Shopping), preview the default tabs, and click Apply Template. You can enable features like Events or Appointments through the Professional Dashboard. To add or update your Action Button, click the three dots (...) at the top-right corner of your page and select Add Action Button.
For a polished look, hide any tabs that don’t have content. For example, an empty Events tab displaying "This page has no events" can leave a bad impression. Also, keep in mind that the text in your About and Services tabs is indexed by Google, which can improve your visibility in local search results. If your page isn't quite ready for public viewing, you can temporarily set your Page Visibility to "Unpublished" in General Settings.
With your tabs and features in place, you’re one step closer to creating a professional and organized page.
Pre-Launch Checklist
Your page is set up, but before you hit "publish", take a moment to run through this final checklist. It covers everything from visuals to administrative details, ensuring your page is polished and ready to make a strong impression. A sloppy launch with broken links or missing details can hurt your credibility, while a well-prepared page can leave a lasting positive impact.
Tasks to Complete Before Launch
Start by double-checking your visual branding. Make sure your profile picture is at least 320 x 320 pixels and your cover photo is 820 x 462 pixels to avoid any pixelation issues. If your cover photo includes text or logos, keep them within the center "safe zone" (approximately 640 x 312 pixels) to ensure they display properly on mobile screens.
Next, verify your core business information. This includes your business name, up to three categories, physical address, service areas, and operating hours. Double-check your contact information, ensuring your phone number, email, and website URL (with the full "https://") are accurate.
Claim your @username (vanity URL) if you haven’t already. A short and memorable username makes it easier for people to find and share your page. Also, confirm that your Call-to-Action button is active and directs users to the correct destination, whether that’s a "Shop Now", "Book Now", or "Contact Us" link.
Add at least one additional administrator to your page as a backup in case you lose access. Enable Messenger and set up instant replies or away messages to let customers know when they can expect a response. Lastly, publish 3–5 initial posts to make your page look active. These could include a welcome message, your business story, or a showcase of your products or services.
Once you’ve completed these steps, you’re ready to test your page.
Test Your Page Before It Goes Live
Before publishing, use Facebook's preview feature to see how your page looks to the public on both desktop and mobile devices. Test every interactive element, including links and your Call-to-Action button, to ensure a smooth experience for visitors.
Check your settings to make sure you haven’t accidentally applied unnecessary country or age restrictions, which could limit visibility for certain users. Consider pinning an important post - like a welcome message or promotional offer - to the top of your feed so it’s the first thing visitors see. Once everything checks out, you can confidently publish your page.
Conclusion
You've now got a clear roadmap to create a professional Facebook Business Page in 20 minutes or less. From picking the right template and adding branded visuals to completing your business details, publishing initial posts, and running a final pre-launch check, every step is designed to get you online quickly without cutting corners.
The templates and checklist act as built-in safeguards, helping you avoid missing important details like your Call-to-Action button, contact info, or messaging settings.
"Your Facebook Business Page is often the first impression potential customers have of your business online. Taking time to set it up properly pays dividends in visibility, credibility, and customer acquisition"
By following a structured process, you eliminate guesswork and ensure your page is polished and professional, avoiding gaps that might undermine your credibility.
With 3 billion active users on Facebook as of mid-2023, having a complete, engaging page is essential. By including 3–5 initial posts, a clear description of your business, and functional tabs, your page evolves from a simple placeholder into a trustworthy hub for your audience.
FAQs
Which Facebook Page template should I choose?
Picking a Facebook Page template that matches your business goals is a smart way to showcase your key features. Facebook offers a variety of templates, such as Standard, Shopping, Services, or Nonprofit, each designed with specific tabs and call-to-action buttons to suit different needs.
To select a template, head over to your page settings in Facebook Business Manager and navigate to the "Templates" section. The best part? You can switch templates anytime, allowing you to adjust and keep your page aligned with your audience's engagement preferences.
How do I make my cover photo look right on mobile?
To make sure your cover photo looks great on mobile, stick to a 16:9 aspect ratio, with an ideal size of 1200 x 674 pixels. Place important elements - like text or logos - within the central "safe zone" to prevent them from being cropped. Since Facebook crops images differently on mobile and desktop, keeping key content centered ensures it looks right on both. Using pre-sized templates or adjusting dimensions beforehand can make this process easier.
What should I post first to get engagement?
When making your first post, aim to leave a lasting impression. Start with a warm welcome message that introduces your brand and sets the tone for what followers can expect. Pair this with something engaging - a special offer, a stunning photo, or a captivating video that reflects your brand’s personality.
Encourage interaction by asking a fun or relevant question, or invite followers to share their thoughts in the comments. Don’t forget: your profile and cover photos are like your digital handshake. Make sure they’re visually appealing and represent your brand well, as they play a big role in creating a strong first impression.
Related Blog Posts
- Profitable Business Ideas You Can Start This Weekend
- From Idea to First Customer in 30 Days: The Exact Roadmap
- The $50 Starter Marketing Plan: Scripts, Templates, and a 1-Week Schedule
- The 20-Minute Business Plan: Copy My 1-Page Template