Starting a food truck can cost less than opening a restaurant, but unexpected expenses often derail new owners. The key is to spend wisely upfront while meeting health and safety requirements. Here’s how you can launch a compliant, profitable food truck without overspending:
- Validate your concept: Test your menu with a pop-up before committing to a full build-out. This avoids wasting $20,000–$40,000 on a kitchen for an unproven idea.
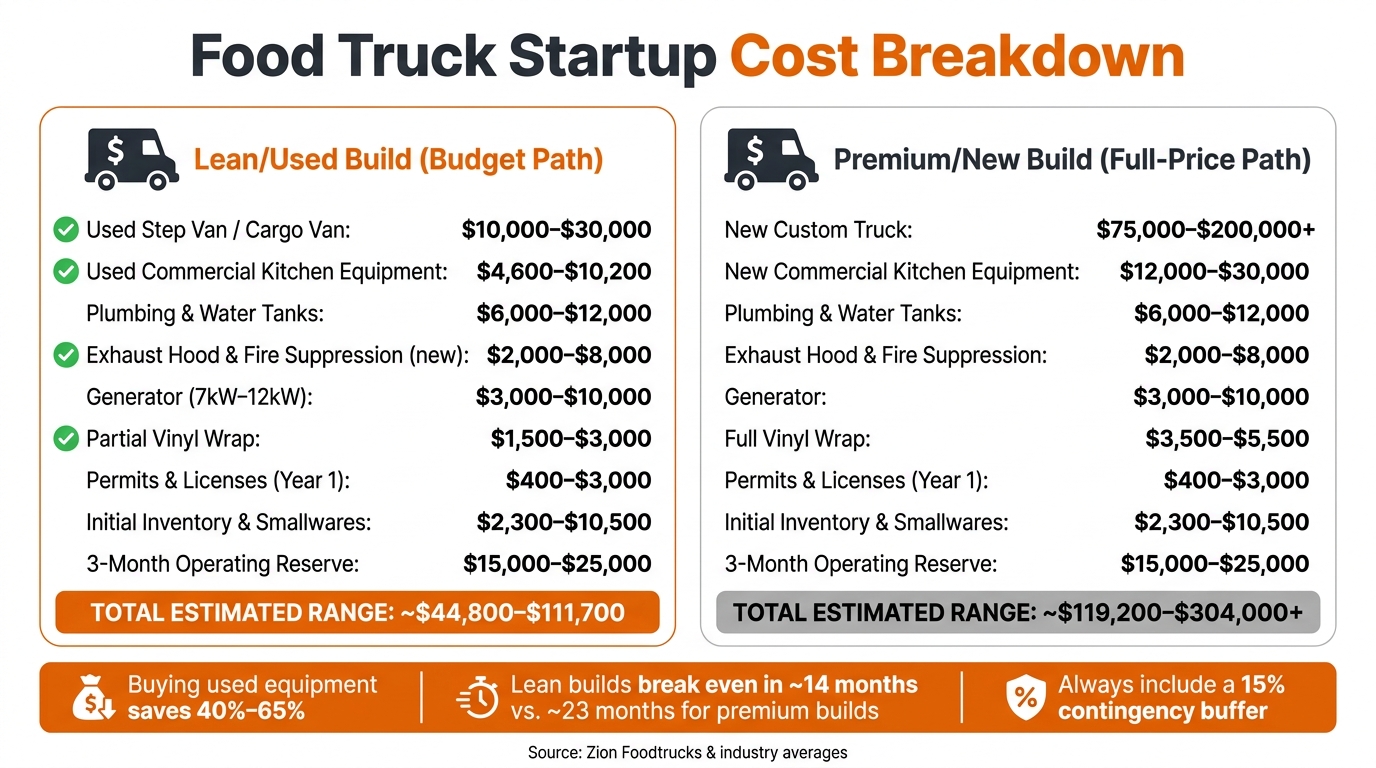
- Set a realistic budget: Expect startup costs between $50,000–$175,000, depending on whether you buy used or new equipment. Include a 15% contingency to cover surprises.
- Choose the right vehicle: Used step vans or trailers can save $10,000–$35,000 compared to custom-built trucks. Turn-key used trucks cost $40,000–$80,000 but may need $10,000–$20,000 in repairs.
- Focus on essentials: Start with only the equipment you need - fire suppression, sinks, refrigeration, and cooking units. Buying used can save 40%–65%.
- Budget for branding: A partial vinyl wrap costs $1,500–$3,000 and still makes your truck stand out. Keep designs simple and bold for readability.
How to Start a Food Truck with Less Than $10K Out of Pocket
sbb-itb-08dd11e
Step 1: Define Your Concept and Check Market Demand
Before diving into equipment purchases or designing your food truck, you need to figure out exactly what you're offering - and whether people will actually pay for it. Skipping this step can be a costly mistake. Jacob Varghese, Founder of Zion Foodtrucks, warns that skipping a paid pop-up test could result in a $20,000 to $40,000 loss if you build a kitchen around a concept that doesn’t resonate with your market.
Narrow Down Your Menu and Target Customer
A streamlined menu is crucial for keeping costs low and operations efficient, especially when you're working within the tight confines of a food truck - often 100 square feet or less. Every extra menu item means more equipment, storage, and prep time, which can quickly drive up expenses.
Focus on 15–20 core items that share ingredients. For instance, if avocado is a key ingredient in your concept, use it across multiple dishes like tacos, sauces, and sides rather than limiting it to one item. This approach keeps your inventory manageable and helps control food costs. Many successful food trucks also limit their protein options to 4–6 items. Going beyond that can lead to longer prep times and overcrowded cold storage.
Equally important is understanding your audience. Are you catering to a corporate lunch crowd that values speed and a $12 price point? Or are you targeting weekend festival-goers who are willing to spend $18 for a more premium experience? These differences go beyond pricing - they affect everything from location choices to service speed and even your marketing strategy.
Once you’ve nailed down your menu and customer profile, it’s time to confirm demand with real-world data.
Use Data to Confirm Demand
After defining your menu and target customer, the next step is to validate that your concept aligns with market demand. The good news? This doesn’t have to cost much.
"Validation is the work you do before you put money down on a build, and it costs almost nothing except time and honesty." - Jacob Varghese, Founder, Zion Foodtrucks
"The single biggest reason new food trucks fail is that the operator built a kitchen for a menu nobody in their market actually wants to buy at a food truck price point." - Jacob Varghese, Founder, Zion Foodtrucks
Start with field research by attending local food truck events. Observe what’s selling, record ticket numbers, and look for gaps in the market. Combine this with digital research by using tools like Google Trends, Yelp, and local Facebook groups to identify what’s trending in your area. You can also check your city’s food truck permit database to see how saturated your market is. For example, if there are already 15 taco trucks in your area, you’ll need a unique twist to stand out.
The best way to validate your concept, however, is through a paid pop-up. Rent a commissary kitchen for a day, get a temporary vendor permit, and serve your menu to 50 paying customers. This not only tests whether people will pay your prices but also gives you honest feedback from strangers - not just supportive friends and family. A single day of real-world testing can be far more valuable than months of planning.
Step 2: Build a Realistic Budget for U.S. Startup Costs
Food Truck Startup Costs: Used vs. New Equipment Breakdown
Once your concept is validated, it's time to map out your expenses. A well-thought-out budget helps you avoid surprises and ensures you're prepared for the decisions ahead, like choosing the right vehicle and equipment. Here’s a breakdown of the key areas to focus on.
Know What You Will Need to Spend
Creating a realistic budget means understanding the main cost categories. This table outlines the typical expenses for launching a food truck in the U.S.:
| Cost Category | Typical Range (U.S. $) |
|---|---|
| Used Step Van / Cargo Van | $10,000 – $30,000 |
| Commercial Kitchen Equipment | $15,000 – $35,000 |
| Plumbing & Water Tanks | $6,000 – $12,000 |
| Exhaust Hood & Fire Suppression | $2,000 – $8,000 |
| Generator (7kW – 12kW) | $3,000 – $10,000 |
| Full Vinyl Wrap | $2,500 – $5,000 |
| Permits & Licenses (Year 1) | $400 – $3,000 |
| Initial Inventory & Smallwares | $2,300 – $10,500 |
Some costs, like fire suppression systems, are unavoidable. Health and fire departments typically require these systems for approval, so budgeting $2,000 to $8,000 for a compliant setup is crucial. Another critical investment is your generator. A properly sized generator is essential - 7kW is a common starting point for trucks with propane cooktops.
"Buy more generator than you think you need. Running a generator at 90% capacity kills it fast. Running at 50–60% doubles the lifespan." - Darnell Kowalski, Equipment & Operations Editor
Additionally, set aside 3 months of operating expenses - around $15,000 to $25,000 - to cover any revenue gaps during your startup phase.
Build a Lean Budget
To keep your budget under control, let your menu guide your spending. Before making any purchases, "cook your menu on paper" by listing every dish and identifying the specific tools needed to prepare them. This approach prevents unnecessary spending and ensures your equipment list stays focused.
When allocating your budget, follow this priority order: vehicle and compliance systems first, equipment second, branding third. Compliance-related items, such as plumbing, electrical work, and fire suppression systems, must be handled by licensed professionals.
If you’re looking to save money, consider buying used equipment. A used setup for a basic burger or taco concept can cost between $4,600 and $10,200, while new equipment can easily run from $12,000 to $30,000. This strategy can save you $5,000 to $15,000, which can be reinvested elsewhere.
Lastly, include a 15% contingency in your budget to cover unexpected costs like failed inspections, permit delays, or last-minute equipment changes. This extra cushion isn’t about being overly cautious - it’s just smart planning. By sticking to this disciplined budgeting method, you’ll be well-prepared for the next steps, like choosing cost-effective vehicles and designs.
Step 3: Pick the Right Vehicle and Layout to Cut Costs
Once your budget is in place, the next major decision is selecting the right vehicle. This choice directly impacts how much you’ll spend on your setup.
Compare Your Vehicle Options
The type of vehicle you choose will largely determine your initial costs, even before you start adding equipment. A used step van, like a Freightliner MT45, Ford E-Series, or Isuzu NPR, is a popular and cost-effective choice. These vehicles typically cost between $5,000 and $20,000 for a solid used chassis, and a professional build-out can range from $25,000 to $70,000. While that may seem like a hefty investment, it’s far cheaper than a new custom-built truck, which starts at $75,000 and can climb past $200,000.
If you’re working with a tighter budget and already own a tow vehicle, a food trailer might be a smarter option. Trailers can be built out for as little as $8,000 to $20,000, saving you $10,000 to $35,000 compared to a truck. However, trailers come with trade-offs, like requiring 30 to 45 minutes of extra setup time at each stop and relying on a tow vehicle. For operators who frequently change locations, this extra time can be a significant factor.
"Buying a turn-key used food truck runs $40,000–$80,000 and is often the lowest total-cost path once labor and compliance rework are factored in." - Ricky Gutierrez, Founder, PitStop
A turn-key used food truck is another option if you want to skip the build process altogether. While the upfront cost is higher, you save time and avoid potential headaches with compliance rework. That said, be prepared for additional expenses - buyers often spend an extra $10,000 to $20,000 on equipment repairs and replacements within the first year.
When choosing your vehicle, don’t forget to confirm its payload capacity. Most truck chassis handle 3,000 to 6,000 lbs, but if you’ll be operating at high altitudes, you may need a more powerful generator. Once the vehicle is selected, it’s time to focus on designing an efficient interior layout.
Design a Simple Layout That Saves Money
After securing your vehicle, the interior layout becomes the next big focus. This is where many new operators overspend or make costly errors. Before buying any equipment, consult your local health and fire departments to ensure compliance with regulations. Then, take the time to plan your layout carefully.
A practical way to start is by using cardboard cutouts to map out your layout. This simple step can help you identify potential issues, like blocked aisles, before anything is installed. For a single-person crew, ensure the aisle is at least 30 inches wide; for two people, aim for 36 inches.
The layout style you choose should match the size of your vehicle:
- Galley layout: Best for trucks 14 to 18 feet long, with equipment along both walls. Suitable for one or two crew members.
- U-shape layout: Ideal for trucks 20 to 24 feet long, creating distinct zones for prep, cooking, and serving.
- L-shape layout: Works well for trucks 18 to 22 feet long, especially for concepts that rely heavily on grills or fryers, as it separates hot and cold prep areas efficiently.
Regardless of the layout, aim for a workflow that moves in one direction: Storage → Prep → Cooking → Serving Window. This streamlined flow prevents crew members from crossing paths during busy periods, which can lead to bottlenecks. Maximize your counter space by utilizing vertical storage, like overhead shelving or magnetic tool strips.
"A bad layout is the single most expensive mistake to fix after the fact. Get the interior right first. Then make it look good." - Darnell Kowalski, Owner
Keep in mind that regulations around sink placement, ventilation, and hood proximity vary widely by city. Getting approvals early can save you from the costly mistake of redoing finished work to meet inspection standards.
Step 4: Source Equipment and Materials Without Overpaying
Getting the right equipment without blowing your budget is essential when starting a food truck. Equipment costs can eat up 40%–50% of your startup funds, so being smart about sourcing can help you launch with some financial breathing room.
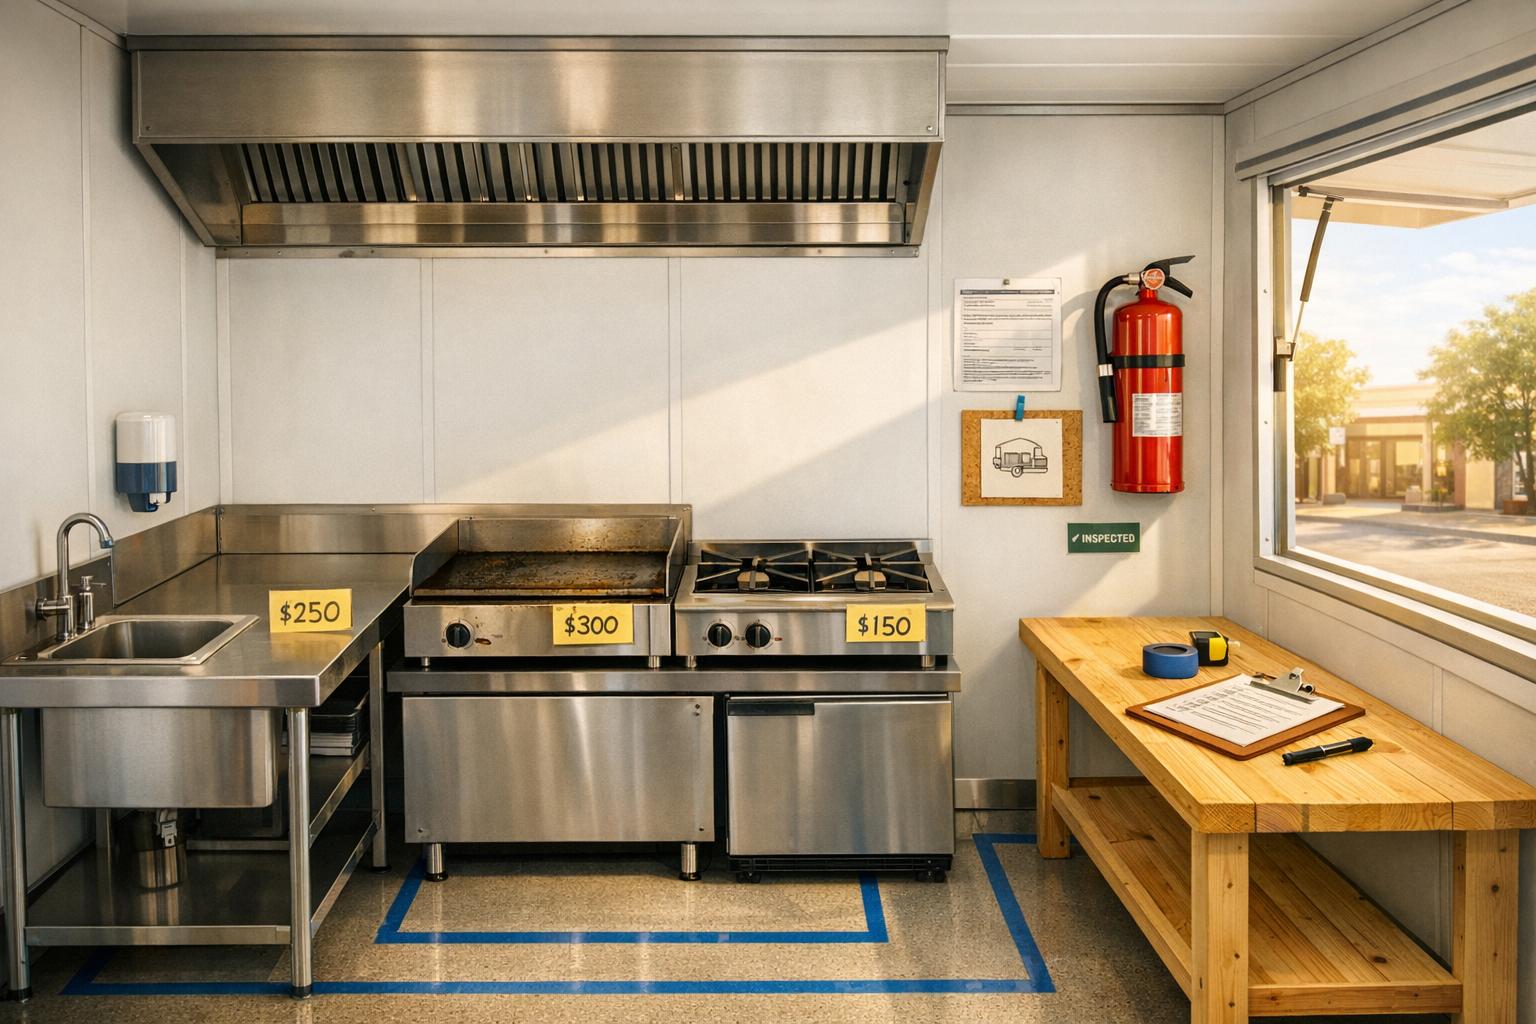
Start With Only the Basics
Stick to the essentials: a fire suppression hood, a primary cooking unit, a three-compartment sink, and refrigeration. These are non-negotiables for compliance and operation. You can always add more equipment once your business starts generating revenue.
Taking a phased approach to equipment helps you avoid overspending on items you might not even use initially. One critical factor to plan for is your generator. Most food truck generators operate between 6,500 and 12,000 watts, so it’s smart to prioritize gas-powered cooking equipment like ranges, griddles, and fryers. This reduces the electrical load and minimizes the risk of power outages during service.
Shop Used or Refurbished to Save Big
Buying used equipment can save you 40%–65%, with auction prices dipping even lower.
"The operators who make the economics work are the ones who buy smart - which, for most equipment categories, means buying used." - KitchenEquipmentTrader.com
A basic used equipment package - covering essentials like a range, griddle, fryer, refrigeration, and sinks - typically costs between $4,600 and $10,200. Compare that to $12,000 to $30,000+ for the same items brand-new. However, not everything should be bought used. Durable items like ranges, griddles, steam tables, and stainless steel prep tables are built to last decades, making them great candidates. On the other hand, refrigeration units and fire suppression systems are better purchased new for their warranties and certifications.
If you’re considering used refrigeration, brands like True and Hoshizaki are solid choices. They have extensive service networks and readily available replacement parts, even for older models. Similarly, legacy brands like Vulcan are dependable for ranges and griddles.
Where you buy matters too. Restaurant liquidation auctions can offer discounts of 60%–80%, but you’re buying as-is, with no guarantees. For a bit more security, check out specialized marketplaces or local equipment dealers, which often refurbish items and include short warranties. This can be a safer option if you’re not confident about inspecting equipment yourself.
Before finalizing any purchase, test the equipment thoroughly. For refrigeration, let it run for at least 25–30 minutes to ensure it holds the proper temperature. If you’re buying a generator, test it under full load with all appliances running simultaneously. Also, verify the NSF mark on food-contact equipment, as health inspectors will not accept verbal assurances or paperwork instead of the physical certification.
Timing your purchase can also make a big difference. Late fall and early winter tend to be the best times to buy, as sellers exiting the business are more motivated, and competition from new buyers is lower.
If buying outright puts too much strain on your budget, leasing might be a viable option.
When Leasing Makes Sense
Leasing can help you manage cash flow for high-cost items like refrigeration and fire suppression systems. Typical lease terms range from 24 to 60 months and require less money upfront.
That said, leasing isn’t always the best choice. For lower-cost, durable items like stainless prep tables or used griddles, buying outright usually makes more sense. Save leasing for equipment that’s both expensive and critical to your operation from day one.
Step 5: Build Your Brand and Customer Experience on a Budget
Once your equipment is sorted, it’s time to focus on your truck’s appearance and functionality. The exterior should reflect your brand, while the interior must support efficient operations - all without overspending. Smart, intentional choices can help you achieve both.
Low-Cost Branding That Gets Attention
Branding doesn’t have to drain your budget. A full vinyl wrap for a 14–16 ft truck costs about $3,500 to $5,500, including materials and labor. If that’s too steep, consider a partial wrap. By only adding your logo, truck name, and contact details to a solid factory-color base, you can spend $1,500 to $3,000. This approach skips wrapping the roof, back, and doors, saving $2,000 to $3,000 while still making your truck stand out.
When choosing materials, don’t skimp on quality. Cast vinyl, like 3M IJ180 or Avery MPI 1105, with a laminate coating is a solid choice. It’s durable, rated for over seven years, and molds perfectly to your truck’s curves.
"A wrap without laminate fades within 18 months and starts cracking soon after. Always ask if laminate is included. It should add $400 to $800 to the total." - Zion Foodtrucks
Keep the design simple but striking. Opt for two flat colors and clean typography instead of complex artwork. Bold, high-contrast color combinations - like yellow and purple or blue and orange - make your truck’s name and cuisine type readable from at least 50 feet away.
"Make your name and cuisine readable from 50 feet away. Bold, high-contrast fonts. If someone across a parking lot cannot tell what you sell, your food truck design is not working." - Darnell Kowalski, Founder, The Truck Chef
To save even more, provide your wrap shop with print-ready artwork. This can cut $500 to $1,200 in design fees. And don’t forget to pair your truck’s exterior branding with a strong social media presence. Platforms like Instagram and TikTok are excellent for sharing your location and specials, helping to attract customers on the go.
While the exterior draws people in, the interior design ensures a seamless customer experience.
Compliant, Budget-Friendly Interior Finishes
A well-designed interior isn’t just about functionality - it’s about meeting health and safety standards without overspending. For walls and food-contact surfaces, stainless steel is a must. It’s durable, easy to clean, and required for compliance. To save costs, opt for used stainless steel prep tables. These typically cost $100 to $400, compared to $300 to $800 for new ones. Just make sure any used equipment has the NSF mark, as inspectors will check for it.
For flooring, consider slip-resistant aluminum diamond plate or commercial-grade rubber mats. Both are budget-friendly and meet code requirements. Another critical detail: all equipment should be mounted at least 6 inches above the floor to allow for proper cleaning access - a common issue flagged during inspections.
Maximize your workspace by using overhead shelving, wall-mounted spice racks, and magnetic knife strips. These additions free up counter space and make tools easily accessible. Proper lighting is another game-changer. LED lights, priced between $100 and $500, are energy-efficient, run cooler, and brighten up compact kitchen spaces.
Conclusion: Start Small and Grow as Revenue Comes In
Spend only on what’s absolutely necessary at the start, and let actual revenue fund your upgrades. As outlined earlier, careful spending and revenue-based improvements create a more sustainable business. Start with a streamlined menu before buying equipment. Opt for a used vehicle and source NSF-certified secondhand gear. Handle cosmetic work yourself, but bring in licensed professionals for gas and electrical tasks. Keep your branding simple and easy to read. These strategies help you avoid waste while maintaining quality.
A lean setup has the advantage of breaking even faster. Typically, it takes about 14 months for a lean build to break even, compared to nearly two years for a premium build. Those extra nine months of carrying costs can put a real strain on your cash flow.
Once your lean build is up and running, focus on efficient operations to support long-term growth. Pay attention to event performance to decide when it’s time to upgrade. Track data like your most profitable locations, best-selling menu items, and your truck’s order capacity. For example, a 16-foot truck with a crew of one or two can usually handle fewer than 80 orders per hour. If your data consistently shows you’re maxing out that capacity, that’s your cue to upgrade - not just a hunch after a busy weekend.
"The truck is an asset. The cash reserve is what keeps it on the road while you build a customer base." - Zion Foodtrucks
As you stabilize operations, keep a close eye on performance metrics and maintain a cash reserve equal to at least three months of operating expenses - generally $15,000 to $25,000. This financial cushion is what separates those who grow steadily from those who struggle after a slow month.
FAQs
What permits do I need to start a food truck in my city?
Permit rules can differ depending on your city or county. Typically, you’ll need a Mobile Food Unit (MFU) permit from the local health department, a business license, and zoning or parking permits. Many health departments also require a commissary agreement to ensure you have access to an approved kitchen facility. Additionally, check with your local fire marshal for propane and fire safety regulations, and find out if any modifications to your truck require a plan review before you begin.
How do I know my truck layout will pass health and fire inspections?
To make sure your layout aligns with local health and fire codes, reach out to your city or county health department and the fire marshal. Request their mobile food unit plan review packet, which outlines key requirements like sink placement, water tank capacities, and propane storage. Before you buy equipment or start building, submit your floor plan for pre-approval to ensure it meets all local regulations.
Which equipment should I buy new vs. used to avoid expensive failures?
When it comes to durability, opting for used cooking equipment like ranges and griddles can be a smart move - they often last 15–20 years. That said, refrigeration is a different story. Always go for new, NSF-certified refrigeration units to prevent food spoilage and avoid potential health inspection headaches. Safety is another area where new is better: fire suppression systems should always be purchased new to ensure reliability. Thinking about a generator? Be cautious. Thoroughly inspect its condition, as older units can quickly turn into expensive liabilities.
Related Blog Posts
- How to Start a Food Truck Business: Permits to Profits
- How to Start a Profitable Food Truck Business: Step-by-Step Guide
- Food Truck Startup Costs: Fit-Out, Fees, and Margins
- How to Start a Food Truck Business: Permits to Profits